
Our guide to setting up artwork for laser cutting is written with Adobe Illustrator in mind; other vector drawing packages such as CorelDraw, Inkscape or Affinity Designer, will have the same options, the menus will just look a little different.
While we offer a full art working service starting from just £30+VAT per hour, following our guide when supplying artwork will help us quote you faster, and save time and money on adjustments as we take your project to production.
While we offer a full art working service starting from just £30+VAT per hour, following our guide when supplying artwork will help us quote you faster, and save time and money on adjustments as we take your project to production.
|
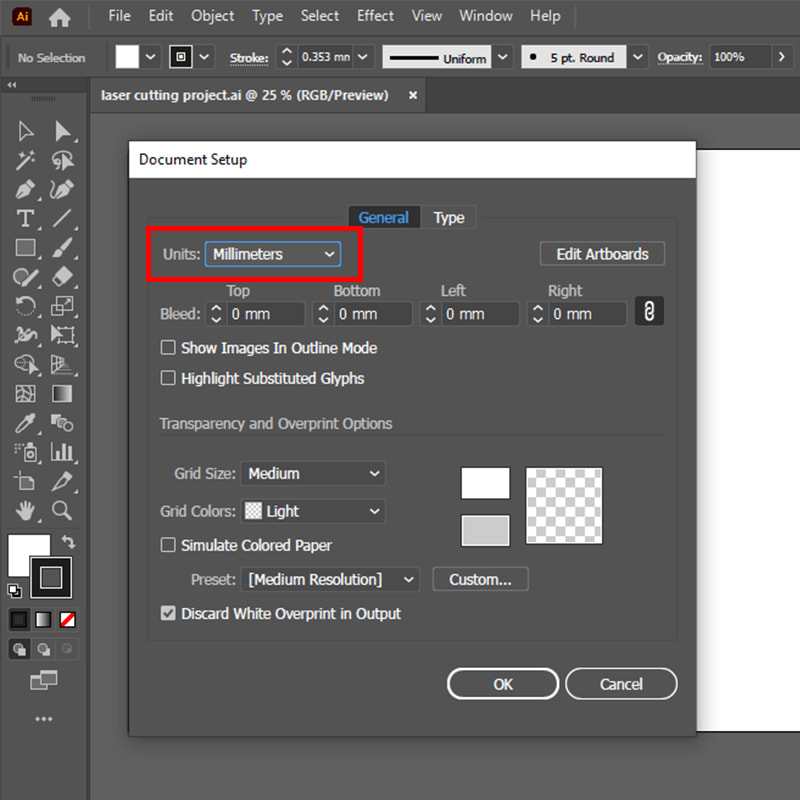
Create a new document and ensure the document units are set to millimetres. This will make sure that when we open your files on our PCs all your measurements are at the correct scale. We do recommend that a reference line or box scaled to 100mm is included in your artwork, just in case! |
|
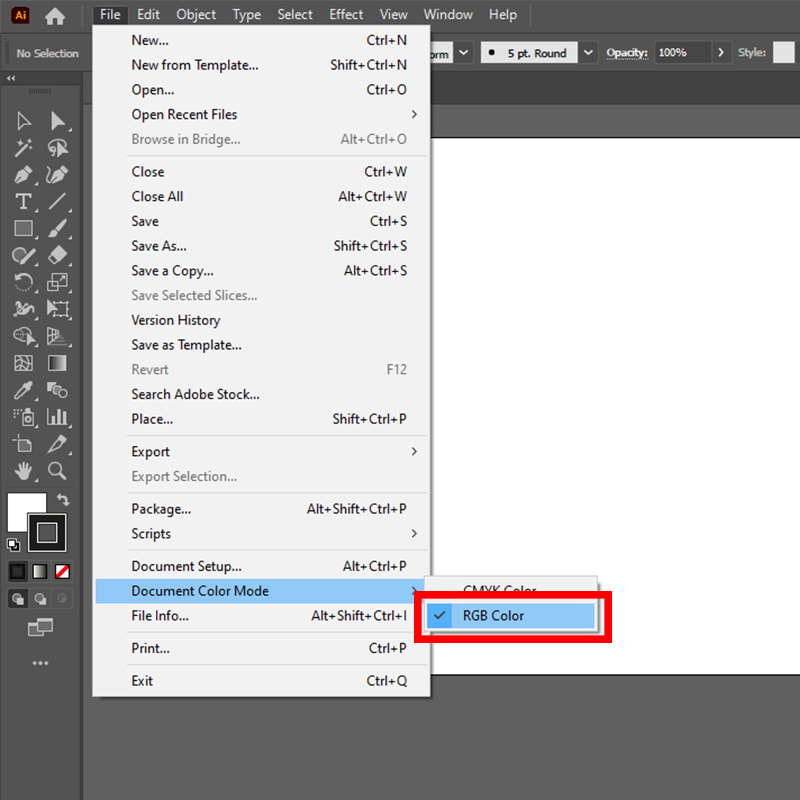
Make sure that your document is set to RGB colour mode. Our lasers read a series of RGB colour codes as cut lines, if the colours are out they are automatically converted to engraving. A document in CMYK colour mode will have inaccurate colours when converted to RGB mode, so if you’re supplying artwork to be printed and cut, make sure the print version is in CMYK to ensure accurate colours on the printed media. |

|
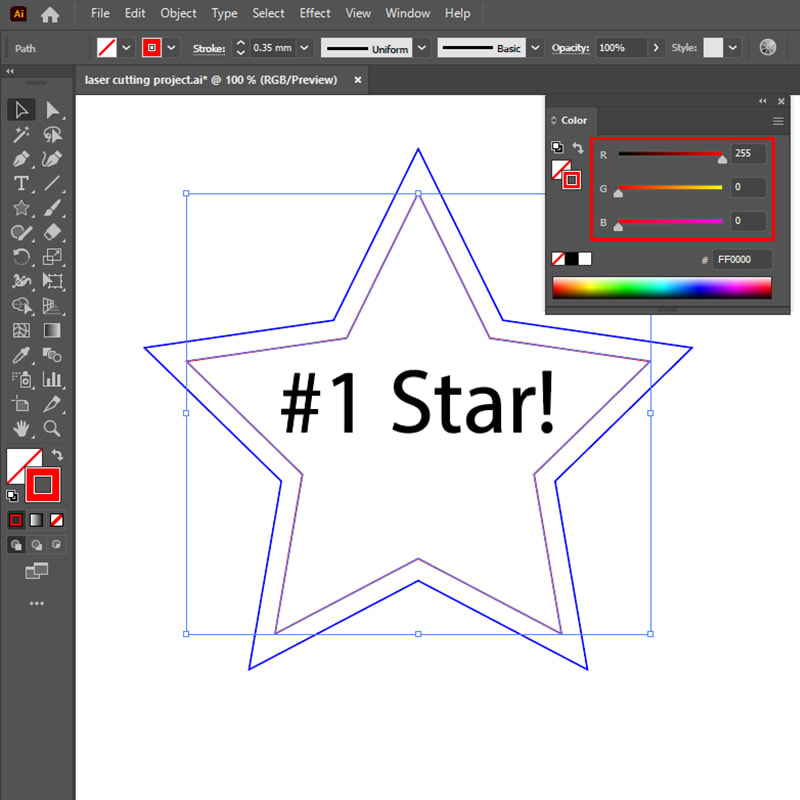
We can use 16 separate colours for different engraving, marking and cutting settings, but most projects can be completed with just 3 colours. Set any lines that are to be cut completely through the material, to 0,0,255 RGB blue. |
|
Set any lines that are to be marked (‘scored’, ‘kiss cut’) into the surface but not cut right through, to 255,0,0 RGB red. Marking lines can be run with a huge variety of settings to get different line widths and depths, so make sure to let us know what effect you’re looking for. Common use-cases include tabs to hold items in a sheet, or to give outlined text a strong dark colour. |
|
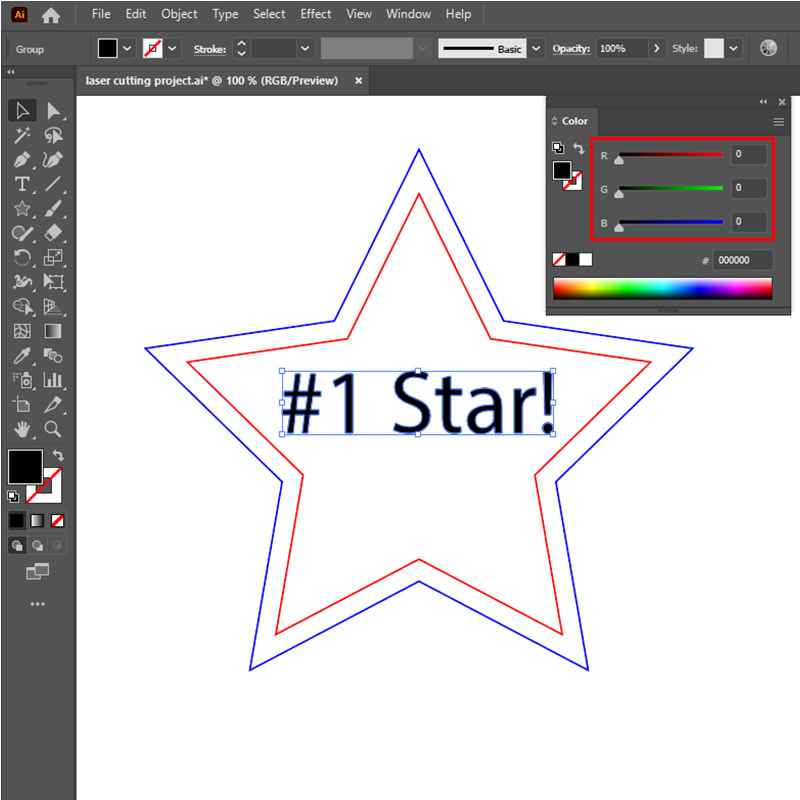
Set any vector areas that are to be raster engraved (‘engraved’, ‘etched’) to have a 0,0,0 RGB black fill. Note that CMYK black is not true RGB black. We can also work from pixel images like photos for engraving. Engraving is used when areas of material, rather than lines, need to be removed. Engraving has a huge amount of flexibility in the effects achieved, so tell us what affect you’re looking for to make sure you get the best result possible. We have years of experience to call on to give advice on materials, effects, and settings to achieve a desired quality or price. |
|
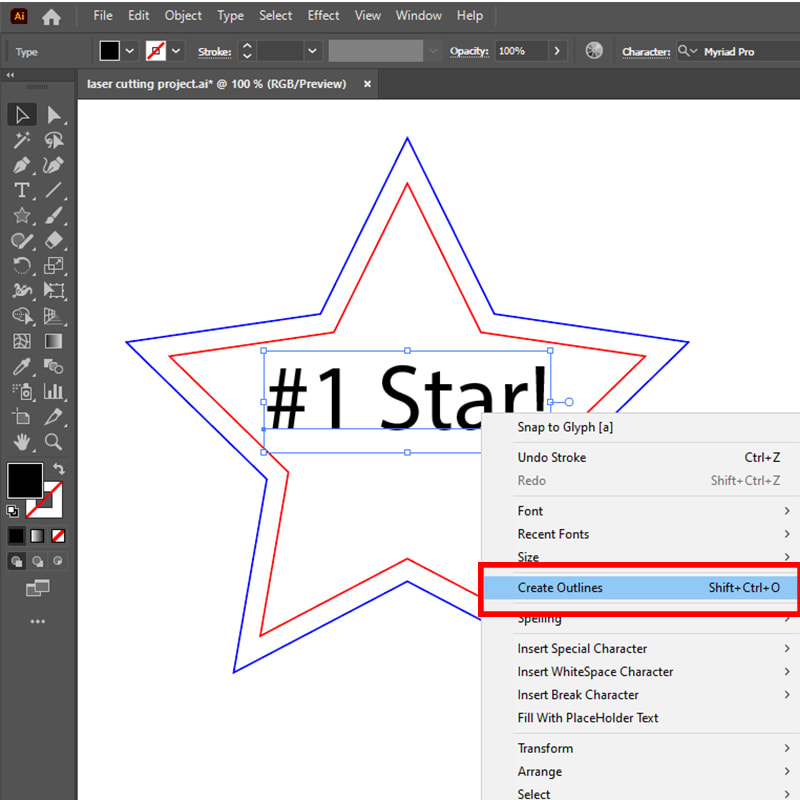
If you’re using text in your artwork, make sure to convert any editable text to outlines before sending the files to us, as if we don’t have the correct fonts on our PCs the text will be converted to a default font when we open the file. Make sure that the text is properly converted to a vector outline, and not just changed from a fill to a stroke appearance. Any font can be used for engraving or cutting as long as it’s converted to a vector shape. |
|
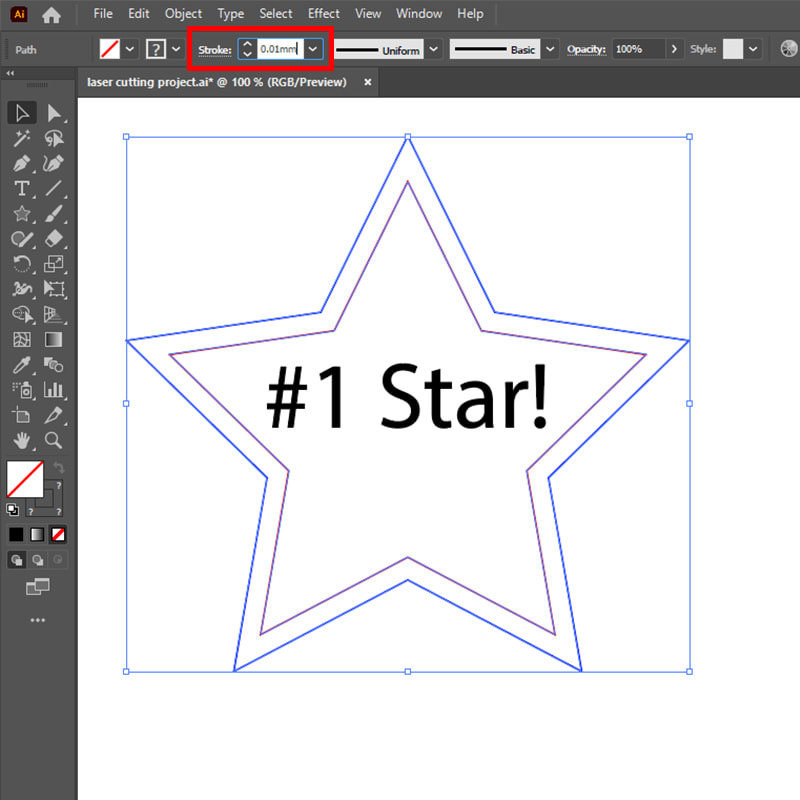
Set any vector lines that are to be cut or marked
to a stroke weight of 0.01mm, or hairline depending on the software you’re using. This is crucial as any lines over 0.01mm are converted to raster engraves by the lasers. Be careful to hide unnecessary lines which may be inadvertently engraved. |
|
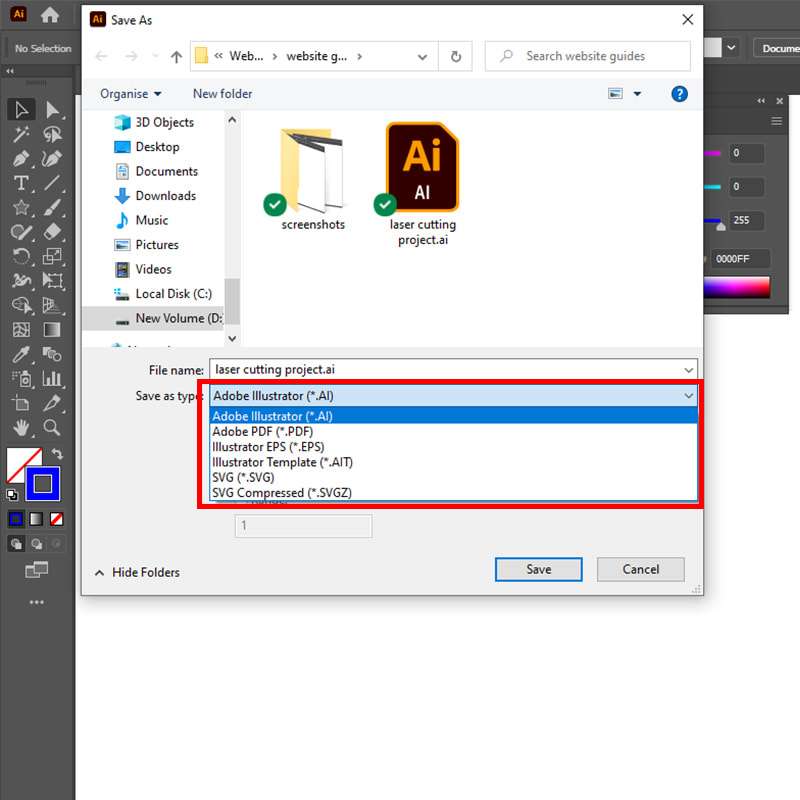
When saving your files to send to us, consider which format to use. Illustrator .ai files are preferred, but any vector format, eg .pdf, .eps, etc can be used. CAD packages will typically export .dxf or .dwg formats. SVG format can be used, but please make sure to include a reference line or shape at 100mm as .svg files don’t always scale correctly when opened in Illustrator. |
|
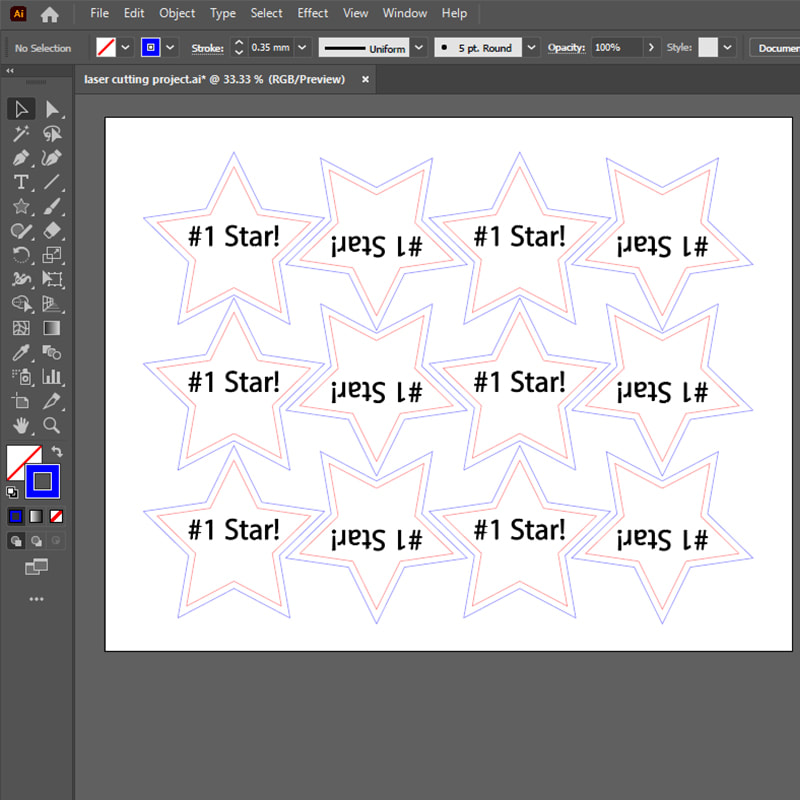
When supplying artwork for batch production rather than one-offs, consider nesting parts together to reduce material use and engraving time. We’re highly experienced in preparing production files for mass production or high-volume engraving, making our advice and artworking service invaluable at the start of an ongoing project. Some simple advice early on can minimize inefficient processes and rejects throughout years of production; we’re proud to say our clients trust us to make the best decisions for them. |
|
If nesting shapes together to share cut lines, make sure to delete any duplicate lines; look for darker lines when the stroke weight is set to 0.01mm. This can be easily achieved in Illustrator using the direct selection tool to select a line and press delete. Sharing cut lines can be a great way to save material and cutting costs, but it must be set up thoroughly and correctly. The lasers will cut any overlapping lines, which can have a negative effect on the accuracy and quality of the finished parts, and even increase the risk of fire! If you have any doubts, use our artworking service. |